Publish by : admin user
21 January 2025 • 7 months ago
Understanding the Order Listing Page
Category : Create & Manage Order
The Order Listing Page on Stegback is designed to help sellers efficiently manage their orders. This guide provides a comprehensive explanation of the page’s layout, features, and functionalities to ensure seamless navigation and usage.
Overview of the Order Listing Page: The Order Listing Page is the central hub where sellers can view and manage all incoming orders. It displays detailed information about orders, including their status, associated customers, and total amounts.
Key Sections of the Order Listing Page
1. Filters Panel: The filters section allows you to search for specific orders based on various criteria:
- Per Page: Select the number of orders to display per page (e.g., 20, 50, 100).
- Order No: Enter the unique order number to locate a specific order.
- Order Date Range: Specify the date range during which the order was placed.
- Product Name: Search for orders containing specific products by entering the product name.
- Product SKU: Look up orders for specific product SKUs.
- Customer Name: Input the customer’s name to find orders associated with them.
- Customer Email: Search orders using the email address of the customer.
- Customer Postal Code: Filter orders by the customer’s postal code.
- Payment Method: Select the payment method used for the order (e.g., Credit Card, Bank Transfer).
- Channel: Choose the sales channel (e.g., Stegback marketplace, website) to view orders from a specific platform.
- Status: Choose from predefined statuses such as "Order Placed," "On Hold," or "Ready to Ship" to filter orders by their current status.
Once you’ve set the desired filters, click the Search Orders button to view the results. Use the Reset button to clear all filters and start a new search.
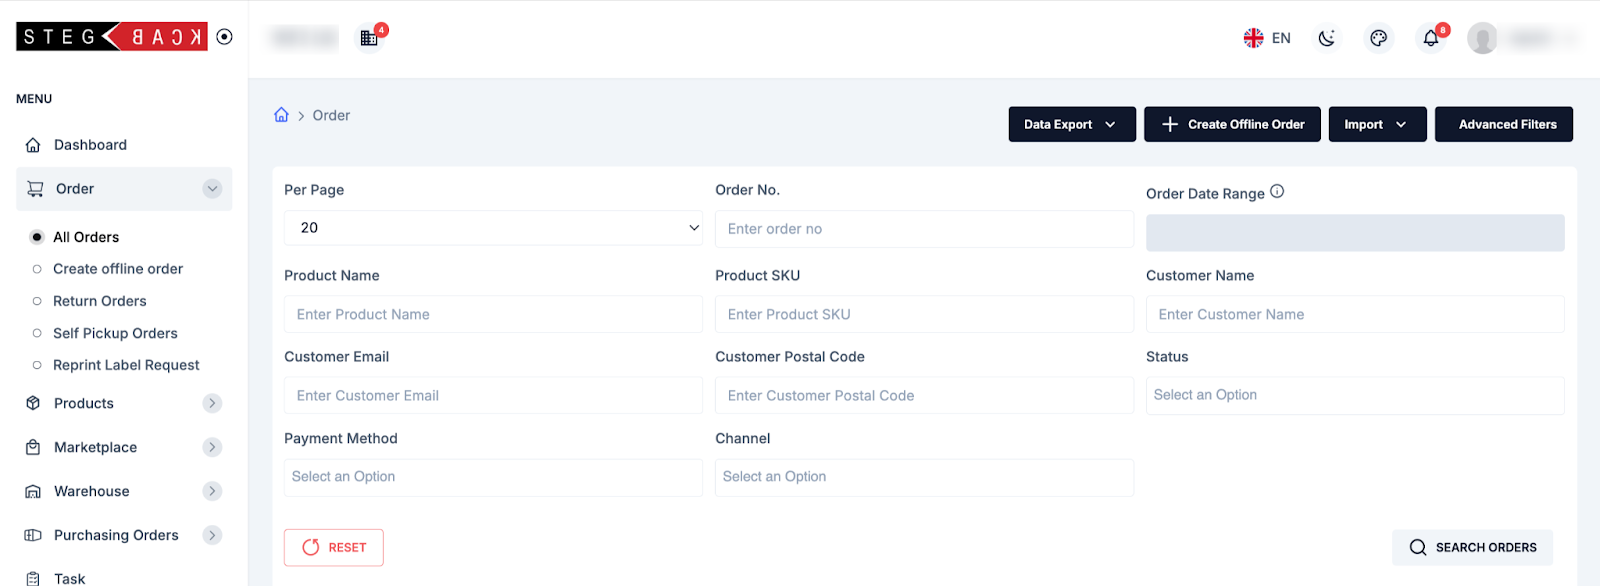
2. Action Buttons
- Data Export: Allows you to export the list of orders in various formats (e.g., CSV, Excel). Use this feature to analyze order data offline or share it with team members.
- Create Offline Order: Enables you to manually add orders that were received outside the marketplace or portal. This ensures all orders are tracked in one place.
- Import: Upload bulk order data using a pre-defined template. This is useful for syncing offline or external orders with the portal.
- Advanced Filters: Provides more granular filter options for detailed searches, allowing you to refine order data based on complex criteria.

3. Order Listing Table
The order listing table provides a detailed view of all orders fetched from the Stegback marketplace. Key columns include:
- S. No: Serial number of the orders for easy reference.
- Channel: The source of the order (e.g., Stegback marketplace, website, etc.).
- Order No: The unique identifier for each order.
- Date: The date when the order was placed.
- Shipping Status: Displays the current shipping progress, such as "On Hold," "Ready to Ship," or "Shipped."
- Company Name/Customer Name: Displays the name of the company or customer associated with the order.
- Amount: The total value of the order in the specified currency.
- Actions: Provides options to view detailed information about the order. Click View to open the order details page.

How to Use Filters Effectively
- Use multiple filters simultaneously to narrow down your search.
- For date-specific searches, ensure the "Order Date Range" is accurately set.
- When filtering by "Status," select one status at a time to focus on specific categories like pending or completed orders.
Export and Import Functionality
Export Orders:
- Click the Data Export button to download the displayed orders.
- Select the desired file format (e.g., CSV or Excel) for your export.
- Use this exported data for reporting, analysis, or record-keeping.
Import Orders: - Click the Import button to upload external orders in bulk.
- Ensure the file matches the required template format.
- Imported orders will appear in the order listing table for further processing.
- Order Management Tips
- Regularly check the order listing page to stay updated on new orders.
- Use the export feature to generate daily or weekly order reports.
- Leverage filters to quickly find specific orders or identify trends in customer purchases.
- Keep track of order statuses to ensure timely fulfillment and avoid delays.
Recent Articles
-
6 months ago
-
6 months ago
-
6 months ago
-
6 months ago
-
6 months ago